|
ROADRUNNER SETUP SPECIFICATIONS
Just like ANY High Performance Model, the Radio Control Boat MUST be "set up" correctly to perform at its highest
level. The Roadrunner Boat is the "State of the Art" in Heat Racing Boats ! It can be made a dominant and
wonderful boat to race. How can this be accomplished? The following is a "step by step" procedure to assure
this perfect setup.
Step  1:	Elongate the holes where the sponson boom tubes go through the hull
			sides so they can be adjusted.
Step  2:	Make some collars to secure the tubes and seal the sides from water
			splashing into the boom tube holes.
Step  3:	Make provision to make the rear of the rear sponsons adjustable up
			and down.
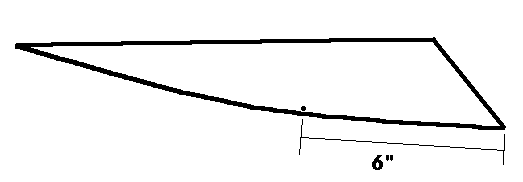
Step  4:	Measure forward from the rear running tip of the front sponson 6" and
			make a mark. Fig 1
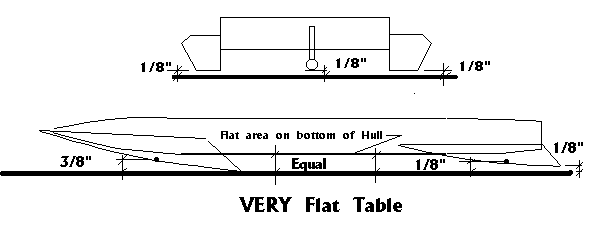
Step  5:	Set the boat on a VERY FLAT Table resting on the front sponsons.
			Place a wedge under the
			strut to make it easy to raise and lower the boat at the strut.
Step  6:	Make the "Flat Area of the Bottom" of the tub parallel with the flat
			table.  Be very particular about it being perfectly parallel.
Step  7:	Slide a 3/8" thick piece of wood along the table under the front
			sponson.  It should stop and hit the bottom of the sponson
			EXACTLY at the 6" Dot you placed on the sponson.  In other
			words, the dot 6" forward from the running tip of the sponson
			will be 3/8" above the table.
Step  8:	Shim under the front and rear tubes until you get this 3/8" height
			PERFECT !  YOU WILL HAVE TO RE-LEVEL THE BOAT AFTER
			EACH CHANGE !
Step  9:	It may take you an hour or two to get this 3/8" height perfect.  It
			will be worth it to you in the way the boat will run.
Step 10:	After you get this 3/8" measurement under BOTH front sponsons
			EXACTLY, you are ready to move to the rear of the boat.
Step 11:	You must keep the boat in this position and loosen the rear sponsons.
			Raise the rear sponsons up as far as they will go and place a
			piece of  1/8" plywood on the table under the rear sponsons.
			Bring the rear sponsons down until they contact the 1/8"
			plywood  and secure with the 8/32 bolt supplied with the kit.
Step 12:	Loosen the strut, since the boat is now supported with the rear
			sponsons on the 1/8" plywood.
			Place a piece of 1/8" plywood under the strut and bring it
			down against the plywood.  On the .21 boat you may want
			a slight amount
			of angle in the strut (rear lower than the front of the strut) to
			allow the boat to more easily lift the back end).  You will want
			progressively less angle as the size of the boat increases.  The .67
			and larger boats will have their strut FLAT against the 1/8" plywood
			with NO strut angle.  On the smaller boats, look for "hop down the
			straightaway" and lessen the angle if there is hop evident.

Step 13:	The setup of the hull is almost complete.  You will want 1/16" to 3/32"
			toe-in on the right front sponson with 1/16" on the smaller boats and
			3/32" on the larger boats.  The left sponson should have from o" to
			1/32" toe-in.
Step 14:	The turn fin will give you either a great turning boat or a boat which
			looses speed in the turns.
			The placement of the fin is VERY important.  The trailing tip of the
			turn fin should be between 3/4" and 7/8" in front of the balance point
			of the boat (WITHOUT FUEL).  Everything should be in the boat as
			you will run it but no fuel.
Step 15:	The width (Spacing) of the front sponsons away from the tub is
			important since it gives the boat a wide stance and a long lever arm.
			This will increase stability and make the turn fin work much more
			consistently.
Step: 16:	I bend my turn fins around a 2" bar to make a roll (Like the drawing
			on the Main Page of My Home Page)
The other two items which attention are the propeller and the engine. The propeller is the
easy part. If you buy a Prop Duplicator for the size Roadrunner you run, you will have as good a prop as you can
get ANYWHERE ! The engine can be built by JFA Custom or you can build it yourself with the help of
The Engine Analysis Program.
|
ENGINE Analysis Software for the Serious RC Competitor
|

