Square Drive Installation
During my time racing model boats, I have used many drive types including: Straight Shaft, Articulated Straight Shaft, Flex Shaft in 1/8", 3/16" and ¼", and most recently "SQUARE DRIVE" in 3/16" and ¼".
In talking with people all over the World, I kept hearing about how great Square Drive was. The basic questions I had were, does the "thrusting" of the drive dog onto a Teflon washer take away performance? Does the removal of the thrusting on the engine help longevity?
I found that with a carefully set up Square Drive System, I could answer the above questions. I found that If anything it HELPED performance by thrusting on the strut rather than the engine, and my engine life was increased tremendously!
How then do we go about setting up a Square Drive System? I know that the makers of boat kits of the performance variety are not happy that I am using square drive, since it makes their job more difficult. I would suggest that after you know how and what is required to set up the Square Drive system, it will not adversely affect them.
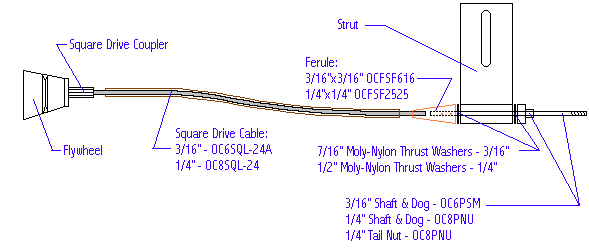
The following sketch shows the components needed to set up the square drive system. I will tabulate them as well so you can find the items more easily.
You need a Square Drive Engine Coupler. If you are using K&B or ANY engine which uses ¼ X 28 crankshaft thread (almost all 21 engines use this as well a some 45 engines), you can order the ¼ X 28 coupler from Octura or from Tom Anderson. If you are going to use ¼" square drive, you can only get the adapter from Tom Anderson. Speaking of Tom Anderson, he has flex square drive adapters available for ALL engines in both 3/16" and ¼". His number is 1-209-261-2357. He is in California so call at a reasonable hour.
The components required are the square drive engine coupler, the square drive cable, the ferrule, the stub shaft and drive dog, and the Teflon thrust washers.
 For 3/16" and ¼" the following Octura Part Numbers are needed.
Items Needed for Square Drive Inst.
| Item | 3/16" | 1/4" |
|---|
| Square Drive Cable | OC6SQL-24A | OC8SQL-24 |
|---|
| Flex Ferule 3/16" to 3/16" | OCFSF616 | |
|---|
| Flex Ferule ¼" to ¼" | | OCFSF2525 |
|---|
| Stub Shaft & Drive Dog | OC6PSM | OC8PS |
|---|
| Tail Nut | | OC8PNU |
|---|
| Thrust Washer (Moly-Nylon) | 3/16" x 7/16" | ¼" x ½" |
|---|
To set up the system you will need to follow the sketch and be sure everything fits with a MINIMUM of friction and perfect alignment. The flex ferule can be soldered onto the flex cable with "Sta-Brite" type 10% silver solder. I have recently used Sta-Brite with the larger 80/90 size applications and have no failures of the solder joint. You should have a slight amount of clearance between the strut and the drive dog/flex ferule so the moly-nylon thrust washers have a small amount of clearance. You don’t want the thrust washers continuously thrusting. I set up about ¼" to 3/16" clearance between the tapered end of the flex ferule and the stuffing box tube. At the front I usually set up ½" to 5/8" clearance between the engine coupler and the stuffing box tubing. The flex shaft should have 1/8" to 3/16" of end play at the engine (in other words the shaft should be 1/8" to 3/16" shorter than the maximum length it could be. The stuffing box should be aligned with the stub shaft at the rear after you have the boat set up as you want it so no bind is present between the shaft and the stuffing box tube.
As for lubrication, I have seen MANY used and it is what you are comfortable with. Hughey Grease is good. Some people use a mixture of several products. I personally use Mercury Marine 2-4-C Marine Lubricant with Teflon. This is available at any Mercury Marine Dealership and works VERY well.
Until Next time…………………
Until next time......
Don't forget to consider a racers edge piece of software for the serious RC Nitro Racer.
RC Nitro Engine Analysis Software
|